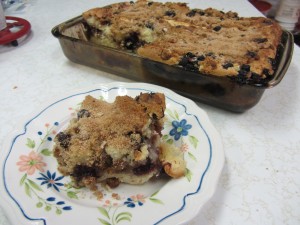
Blueberry Coffee Cake

Blueberry Coffee Cake

I’m back with another blueberry recipe this week. We picked another 5 pounds last weekend. I don’t usually cook sweet dishes so I’m looking for a few savory blueberry recipes. I’m thinking something with rosemary and lemon zest. But for now, here’s something sweet.

Blueberry Coffee Cake
Batter:
2 c. flour
1 tsp. baking powder
1/4 tsp. salt
2 c. sugar
1 c. butter
2 eggs
1 c. sour cream
1/2 tsp. vanilla extract
Crumble:
1 c. brown sugar, packed
1 c. flour
3 Tbsp. butter, melted
2 tsp. cinnamon
2 c. fresh blueberries
1 c. pecans, chopped

Combine flour, baking powder and salt in a bowl and set aside. Using an electric mixer, beat sugar and butter until light and fluffy. Add 1 egg and blend before adding the other egg. Slowly stir in the sour cream and vanilla extract. Then add the flour mixture and blend until incorporated.

Prepare a 9×13″ baking dish with cooking spray. Spread half of the batter into the dish.

Mix brown sugar, flour, butter and cinnamon together making a crumble. Sprinkle half each of the blueberries, crumble and pecans over the batter in the dish. Spread the remaining batter on top. Then sprinkle on the remaining berries, crumble and pecans.

Bake in a 350-degree oven for 50 minutes or until done – toothpick inserted in the middle will come out clean.

Blueberries, blueberries and more blueberries

BBerry Pie

Blueberries are my favorite fruit. I buy them fresh, frozen and dried to eat as a snack or with my morning yogurt. A few years ago I was at the grocery store looking at a high-priced package of the fresh berries, contemplating if they were worth it. A nice older gentlemen leaned over next to me and quietly said, “You know, you can grow those.” I laughed and said that I probably should.

That next spring, I bought four bushes from a local nursery and planted them. Three thrived and the fourth succumbed to an ant colony that I still can’t seem to get rid of. I didn’t expect berries that first year, but thought I’d get a few the second. I saw the flowers bloom, but no fruit. The third year, I picked about a handful and was pretty disappointed. I planted three more bushes of another variety because I had read that planting multiple types together is a good idea. I just can’t remember why.

Last year the first three bushes were big, beautiful and full of flowers, and a little later had green berries. I watched the berries dwindle over the passing weeks. I was stumped until the day I found several of my hens gathered around the bushes. They would fly up, flap their wings and beat at the bushes. When they landed, they quickly began to peck the ground below. My free-to-roam-where-they-please chickens were eating all of my berries before they even had a chance to ripen. No wonder their yolks are a deep orangey-yellow.

This year I wised up and pounded in T-posts and wired goat fencing to completely enclose the bushes. I am pleased to say that as of yet, no chickens have scaled the fence, and the wild bird population hasn’t damaged much.

A week ago I picked 3.5 pounds of berries from those first three bushes. Last weekend, my son picked 8 more. There are still ripening berries to be picked.

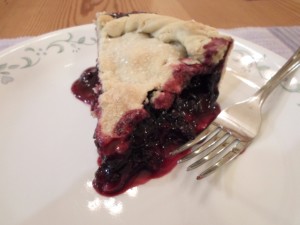
I froze a gallon bag and I also made a large blueberry pie. It was so large I ended up cooking it in a casserole dish.

Blueberry Pie
6 c. blueberries, rinsed and dried
1 c. sugar
1/3 c. flour
1 tsp. Kosher salt
1 tsp. fine lemon zest
1 Tbsp. freshly squeezed lemon juice
2 Tbsp. cold butter, cubed

In a large bowl, stir together the blueberries, sugar, flour, salt and lemon zest. Let sit while preparing the pie crust (recipe to follow).

Refrigerate the dough for at least 30 minutes. Then place on a well-floured surface. Cut the dough in half and roll out the bottom pie shell first. Place dough in pie pan (or casserole dish) being careful to fill the pan without stretching the dough.

Pour the blueberry mixture into the shell. Drop cubes of butter evenly on top of the fruit and drizzle on the lemon juice. Then roll out the top shell. Drape over the pan and tear away extra dough, leaving 1/2 to 1 inch all around. Seal the top and the bottom shells together as you prefer. I like to gently twist and tuck the dough all around. When it comes out of the oven, the edge resembles a rope circling the pie.

I like to brush butter over the top and sprinkle with sugar. Then bake in a 375-degree oven for 20 minutes. If the crust is browning too quickly, put foil over the edges and cook for another 25 minutes. I checked my pie at that point and decided to add another 10 minutes. It probably needed more time because it was so large. When I pulled it from the oven, it was golden brown and the juices were bubbly.

Pie Dough
3 c. flour
1 Tbsp. sugar
1 tsp. Kosher salt
2 sticks cold unsalted butter, cubed
1/2 cup ice water

In a food processor, pulse the flour, sugar and salt a few times to combine. Then add really cold cubes of butter. Pulse until the mixture looks crumbly – about 12 times. Then drizzle in cold water while continuing to pulse until the dough clumps together. Drop the dough on a floured surface and gently press together to form a ball. Cover with plastic wrap and place in the fridge to rest.

We’ll have the rest of the berries for breakfasts and snacks. But I also really enjoy them in a spinach salad. Adding fruit to greens perks them up and can be a nice change.

Spinach and Berry Salad
5-6 c. fresh spinach, cleaned and torn
1/4 c. olive oil
1/8 c. balsamic vinegar
1/2 Tbsp. honey
Salt and freshly cracked black pepper, to taste
1 c. strawberries, cleaned and halved
1 c. blueberries, rinsed and dried
1 c. pecans

Place spinach in a large bowl. Whisk together olive oil, balsamic vinegar and honey. Pour over spinach and sprinkle with salt and pepper. Toss the spinach with the dressing. Top the salad with strawberries, blueberries and pecans. Shaved pieces of Parmesan cheese also make a nice salty-nutty addition.

*** Quotes from Julia Child ***
“A party without cake is just a meeting.”
“The only time to eat diet food is while you’re waiting for the steak to cook.”
“If you’re afraid of butter, use cream.”
“I think every woman should have a blowtorch.”

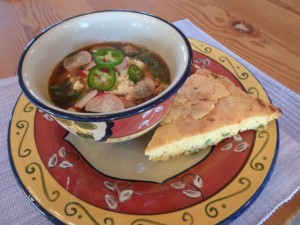
Posole – traditional New Mexico stew

Posole and cornbread

Lately I’ve been so busy trying to keep up with all my work and other obligations that I struggle to find the time to cook. That’s when it’s easiest to make a large roast and use portions toward several quick meals later in the week. I bought a huge pork roast. It must have been 6-7 pounds.

The evening before I planned to cook it, I rubbed it down with spices, wrapped it up and let it sit in the refrigerator overnight. The recipe for the rub follows. It makes more than you’ll need for one application and is also good with chicken and beef. Store unused rub in an air-tight container.

Spicy Sweet Rub
3/4 c. brown sugar
1 Tbsp. Montreal steak seasoning
1 Tbsp. Kosher salt
1 Tbsp. chili powder
1 Tbsp. garlic powder
1 tsp. cayenne pepper

Mix all ingredients together.

The next morning, I pulled the roast from the refrigerator and let it sit for about 30 minutes. Then I seared all six sides in a shallow pan until they were golden brown. I placed it in my largest crock pot without adding any liquid. Cooking on high heat for the first two hours brought it up to heat quickly. Then I turned the heat to low and cooked for 4 more hours.

When done, I let the roast rest for about 30 minutes before pulling off a portion to shred for pulled pork sandwiches. The roast made lots of juice. I mixed some with a thick barbecue sauce and dressed the shredded pork with it. Save the remaining juice for later use. Break the remaining cooled roast down into a couple of containers and refrigerate.

We had pork sandwiches and street tacos for several meals. Street tacos are so easy to pull together once the meat is cooked. Just reheat the meat, chop vegetables and shred cheese. Roll it all up in a tortilla.

With the last portion of the roast, about 2 pounds, I made posole, a traditional New Mexico stew using hominy. My version is a little spicy and I serve it with cheddar cheese and jalapeño cornbread.

Posole
1 large onion, diced
2 green peppers, diced
1/2 jalapeño, minced
1 Tbsp. olive oil
2 bay leaves
3 cloves garlic minced
2 cans Rotel tomatoes
2 cans hominy
2 tsp. oregano
2 tsp. ground cumin
2 tsp. chili powder
8 c. beef stock (or combine beef stock with leftover pork juice to equal 8 cups)
2 lbs. cooked pork roast, shredded
Salt and pepper to taste

Sauté onion and peppers in olive oil with a pinch of salt and pepper. Add bay leaves and garlic and cook for about 2 minutes. Add tomatoes, hominy and remaining spices. Cook while stirring until the ingredients are incorporated and fragrant. Add stock and shredded pork and bring to a boil. Taste and adjust seasonings. Then turn down the heat and simmer for 45 minutes to an hour.

Garnish the stew with sliced radishes, jalepeños, chopped cilantro and crumbled queso fresco. I also served with cornbread and our favorite is to add minced jalapeños and cheddar cheese. One can easily make the cornbread batter from scratch but if in a hurry, a mix purchased at the store speeds things up. I followed the directions on the back of two packages of mix and added 2-1/2 minced jalapeños along with a cup of shredded cheddar cheese.

Be sure to place about a Tbsp. of vegetable oil in a cast iron skillet and preheat at 400 degrees for about 7-8 minutes. Remove the screamin’ hot pan from the oven and pour in the batter. It’s perfect when the batter begins to fry as you pour. Return the skillet to the oven and cook as directed on the package or 20-25 minutes until the top is golden brown.

For a less spicy version of posole, skip the jalapeños and substitute tomato bits for the Rotel.

Spaghetti Squash

Spag Squash

On Sunday, I was finally able to work in the garden. I certainly said a prayer over each pathetic root-bound seedling I transplanted. Hopefully they will grow strong enough to survive the heat – and the rabbits.

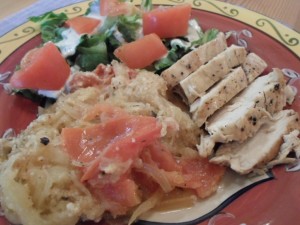
One of my neighbors read about my gardening woes this year and brought me zucchini and spaghetti squash. One of the easiest ways to cook spaghetti squash is in the microwave.

Place the whole squash in the microwave and heat on high for 1-2 minutes. This will soften it and it will be easier to cut in half. Remove the seeds and place the halves cut-side down on a dish. Add a little water and cover with plastic wrap. Microwave each half for 6 minutes or until the squash yields to the pressure of a finger. Cool until it can be handled and remove the flesh with a fork, separating the strands.

Once cooked, many just add marinara or another type of sauce. That is certainly good, but one can be more creative. Spaghetti squash is a very versatile vegetable.

Warm Squash Salad
1 large spaghetti squash, prepared
1 Tbsp. butter, melted
1 Tbsp. olive oil
1 large tomato, diced
2 green onions, thinly sliced
1 clove garlic, minced
1/4 c. grated Parmesan cheese
Salt and pepper, to taste

Toss all ingredients together and serve warm.

Spaghetti Squash Frittata
1/2 bell pepper, thinly sliced
1 onion, thinly sliced
1 c. spaghetti squash, prepared
2 tsp. fresh basil, chopped
1/2 tsp. salt
1/4 tsp. pepper
1 tomato, sliced
4 eggs
1 tsp. dried oregano or basil
Parmesan cheese

Toss pepper and onion slices with squash and seasonings. Spread on the bottom of an 8″ greased pie pan. Lay tomato slices on top. Whisk the eggs and pour over the vegetables. Push the vegetables down to ensure most are covered by the eggs. Sprinkle dried herbs over the top. Bake at 350 degrees until set. Sprinkle the top with freshly grated Parmesan cheese and serve.

Another idea is to pile the squash with cheese, minced garlic, crumbled bacon pieces, salt and pepper on large portabella mushrooms. Bake until the mushrooms are soft.

And just one more, toss hot squash with wilted spinach, caramelized onion, garlic and bacon. Dress with olive oil and balsamic vinegar.

Pizza on the Grill

Pizzas from grill

I believe it is officially grilling season, although I am willing to grill all year long. I perfected this week’s recipe when I lived in the mountains of Evergreen, Colorado. I think it was in 2003 during Winter Break with guests in the house when 10 feet of snow fell and the power was off for over four days.

I could light the gas burners with a match and that worked for most dinners, but I wanted to cook individual pizzas and the oven was electric. I had planned a pizza party one of those nights and I had heard of cooking pizzas on the grill, so I decided to give it a try.

Pizza Dough
1-1/2 c. warm water
2 tsp. yeast
2 tsp. sugar
4-1/2 c. flour
2 tsp. salt
2 Tbsp. olive oil

Dissolve yeast and sugar in water. Add half the flour and start to mix with a wooden spoon or by hand. Then combine the salt with the remaining flour and add to the mixture. Drizzle in the olive oil. Keep trying to mix by spoon or hand but when it gets too difficult, plop it on to a floured counter top and knead for about 5 minutes until the dough is smooth. Wrap it in plastic and refrigerate for about 30 minutes. That recipe makes 4 10-inch pizzas. I just rolled it out with a rolling pin.

Quick Pizza Sauce
1 large can crushed tomatoes
2 tsp. Italian seasoning
2 tsp. sugar
1/2 tsp. pepper
1 tsp. salt
1 Tbsp. tomato paste
1 tsp. dried basil

Heat the crushed tomatoes in a small pot. Add Italian seasoning, sugar, pepper and tomato paste. Cook on medium heat for at least 10 minutes. The sauce will reduce a little during that time. I tasted it and decided to add the dried basil.

I worked at Pizza Hut in high school and was an assistant manager during two years of college. At that time, there was a rank one could achieve of Pizza Hut Professional, and I still consider myself to be one. I’m kidding around, but it is important to know what you’re doing because using the right amount of sauce keeps the pizza from being too dry; too many wet toppings make the dough soggy; proper layering of ingredients and the use of cheese help provide the glue to hold it all together.

So to grill pizzas, dust a pizza peel with cornmeal, roll out one pizza shell and lay it on the peel. Outside on a medium-heated grill, slide the shell off the peel. While it cooks, roll out the next one and slide it onto the grill as well. Watch closely. When grill marks start to show and the shell is easily flipped over, do so. Grill the other side. If a bubble starts to show, pierce it gently with a metal spatula. Cook the rest of the shells and bring inside for guests to top.

Start with the sauce and spread evenly up to 1/2-inch from the edge. Sprinkle a handful of cheese over the sauce. Layer on flat meats like pepperoni, sliced ham and/or Canadian bacon. Then sprinkle on the vegetables keeping in mind that too many can make the pizza soggy. Crumbled meats like cooked ground meat and pork go on top of the vegetables. Then to hold it all in place, sprinkle on another handful of cheese. Back in the day, we sprinkled on something called Fairy Dust, but just in case that’s still a secret, I won’t describe exactly how it was made. However, doesn’t a little grated Parmesan and a pinch of dried oregano sound like a good finishing touch?

Scoop the topped pizza shell onto the peel and slide on the grill again. This time, close the lid to hold in the heat. Check often and since everything is already cooked, it’s done when the cheese has melted and the crust is golden. Just keep a close eye on the bottom of the shell so it doesn’t burn. Adjust the heat as necessary.

I made grilled pizza Sunday night for dinner. I sautéed mushrooms, onions and green peppers for the topping and cooked Italian sausage. When cooking on the grill, it doesn’t stay in the heat as long as an oven, so pre-cooking those toppings is best. After I removed the pizzas from the grill, I topped mine with freshly chopped basil.

Obviously pizza shells and sauce can be purchased at most grocery stores, so if you don’t have time to make it from scratch, don’t let that stop you from making your own pizzas at home, using the ingredients you like best. Kids like to make their own and do-it-yourself pizza is fun at a party. Just prepare shells ahead of time, lay out toppings and let the guests create their own. Then someone just needs to man the grill and finish cooking them.